Why Pipette Maintenance Is Essential
- Accuracy and reproducibility rely on tight seals, intact pistons, and clean shafts.
- Regulatory compliance requires documented and traceable calibration and service.
- Instrument longevity improves with routine cleaning and lubrication of moving parts.
- User safety increases when contamination and carryover are minimized.
Regular maintenance is a cornerstone of good liquid handling, ensuring that laboratory results remain trustworthy and consistent.
Pipette Calibration and Routine Maintenance
Recommended Intervals
Most labs calibrate pipettes every 3 to 12 months, depending on workload, solvents used, and quality requirements. Lab instruments used daily or with harsh liquids may need more frequent checks.
Signs That Immediate Maintenance Is Needed
- Liquid visible inside the shaft or body
- Dripping while aspirating or after dispensing
- Sticky or loose pipetting button
- Irregular results during functional testing or gravimetric checks

Pipette Maintenance Guide
Well-maintained pipettes protect data quality, reduce downtime, and extend instrument life.
This guide summarizes functional testing, calibration, and cleaning workflows you can use across single-channel and multi-channel pipettes.
Functional Testing With a Leakage Test
Leakage is the most common cause of inaccuracy in piston-operated pipettes. A quick leakage test confirms seal integrity and identifies issues before they affect data. BRANDTECH’s Pipette Leak Test (PLT) unit makes this process simple, detecting even the smallest leaks within seconds and giving labs a reliable way to verify performance between calibrations.
Why Run a Leakage Test
- Detects small leaks in pistons, seals, and tip interfaces
- Verifies fit with the selected pipette tip
Provides a fast check between full calibrations
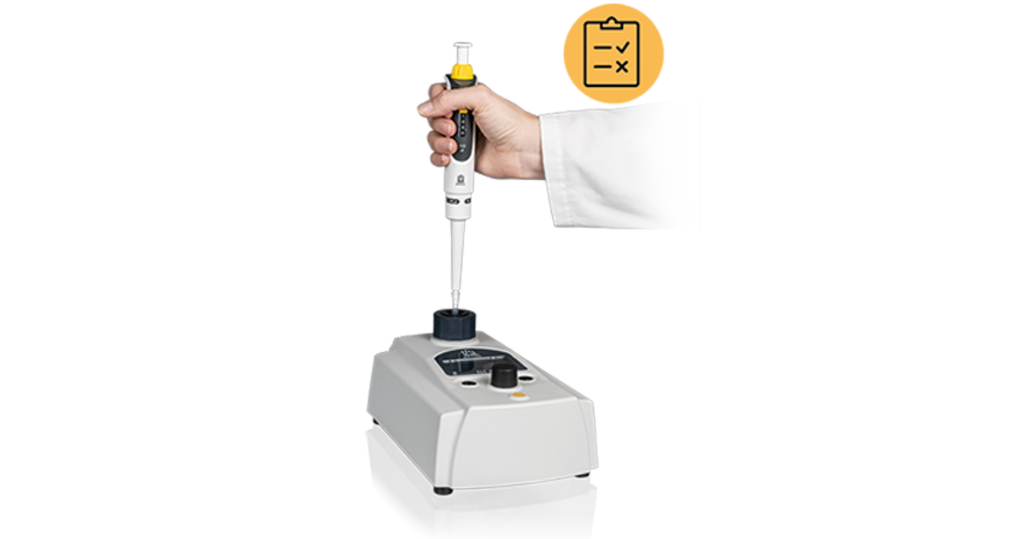
How To Perform a Leakage Test with the PLT Unit
- Attach a recommended pipette tip and aspirate at the desired test volume.
- Insert the pipette into the BRANDTECH PLT unit.
- The PLT unit automatically measures pressure stability and detects even the smallest leaks within seconds.
- If a leak is detected, inspect the tip fit, seals, or piston. Perform cleaning or part replacement as needed, then re-test with the PLT unit to confirm accuracy.
Free Pipette Performance Check Between Calibration Intervals
Not sure if your pipette is still performing within spec between calibration intervals? Request a free in-person pipette leak check from your local BRANDTECH Sales Representative to confirm performance and identify issues early.
Adjustment and Easy Calibration Technology
When a pipette falls slightly out of spec, an adjustment can bring it back without a full teardown. Modern designs, like BRANDTECH’s Easy Calibration technology, allows quick access to the calibration mechanism, supporting different liquid types and viscosities.
Quick Adjustment Workflow
- Verify performance with a gravimetric check.
- Access the adjustment interface and make a small change.
- Repeat the gravimetric check at multiple volumes.
- Record results and return the instrument to service.
Disassembly and Cleaning Best Practices
Follow manufacturer instructions for your specific pipette model. Always use protective equipment and work over a clean tray to protect small parts
BRAND Single-Channel Pipettes
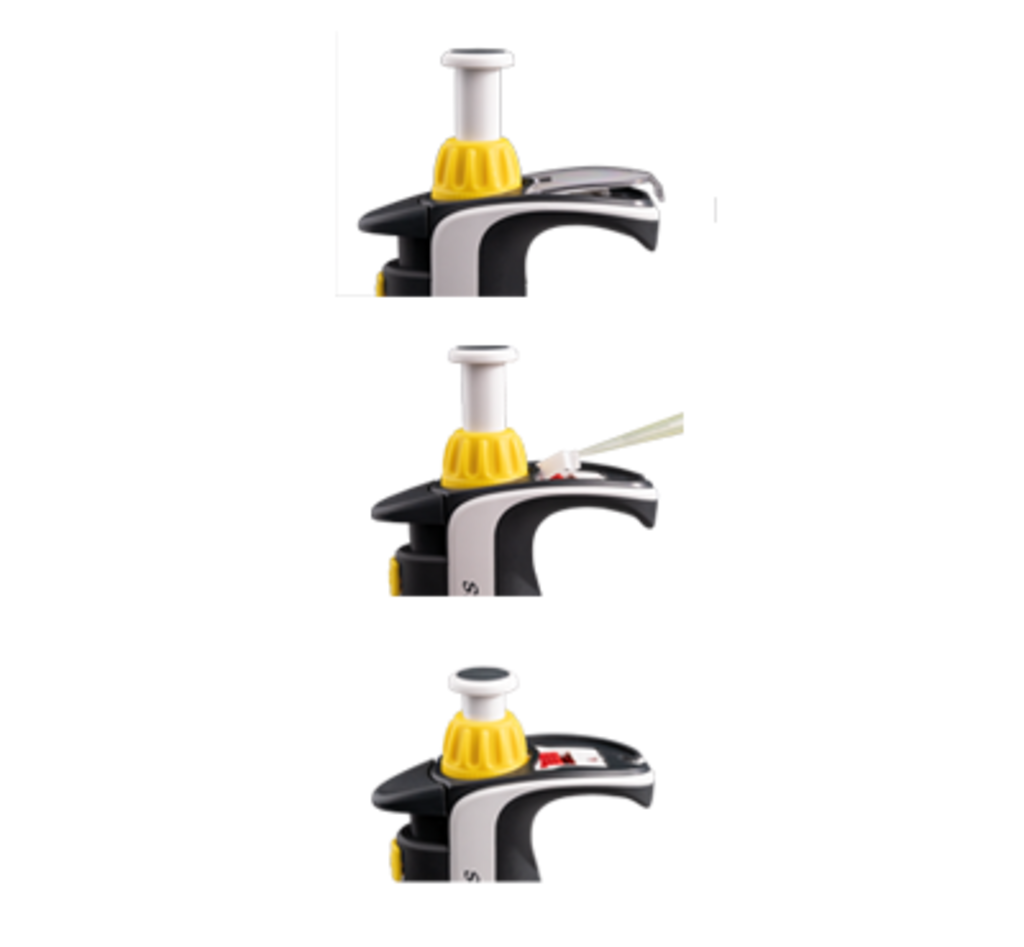
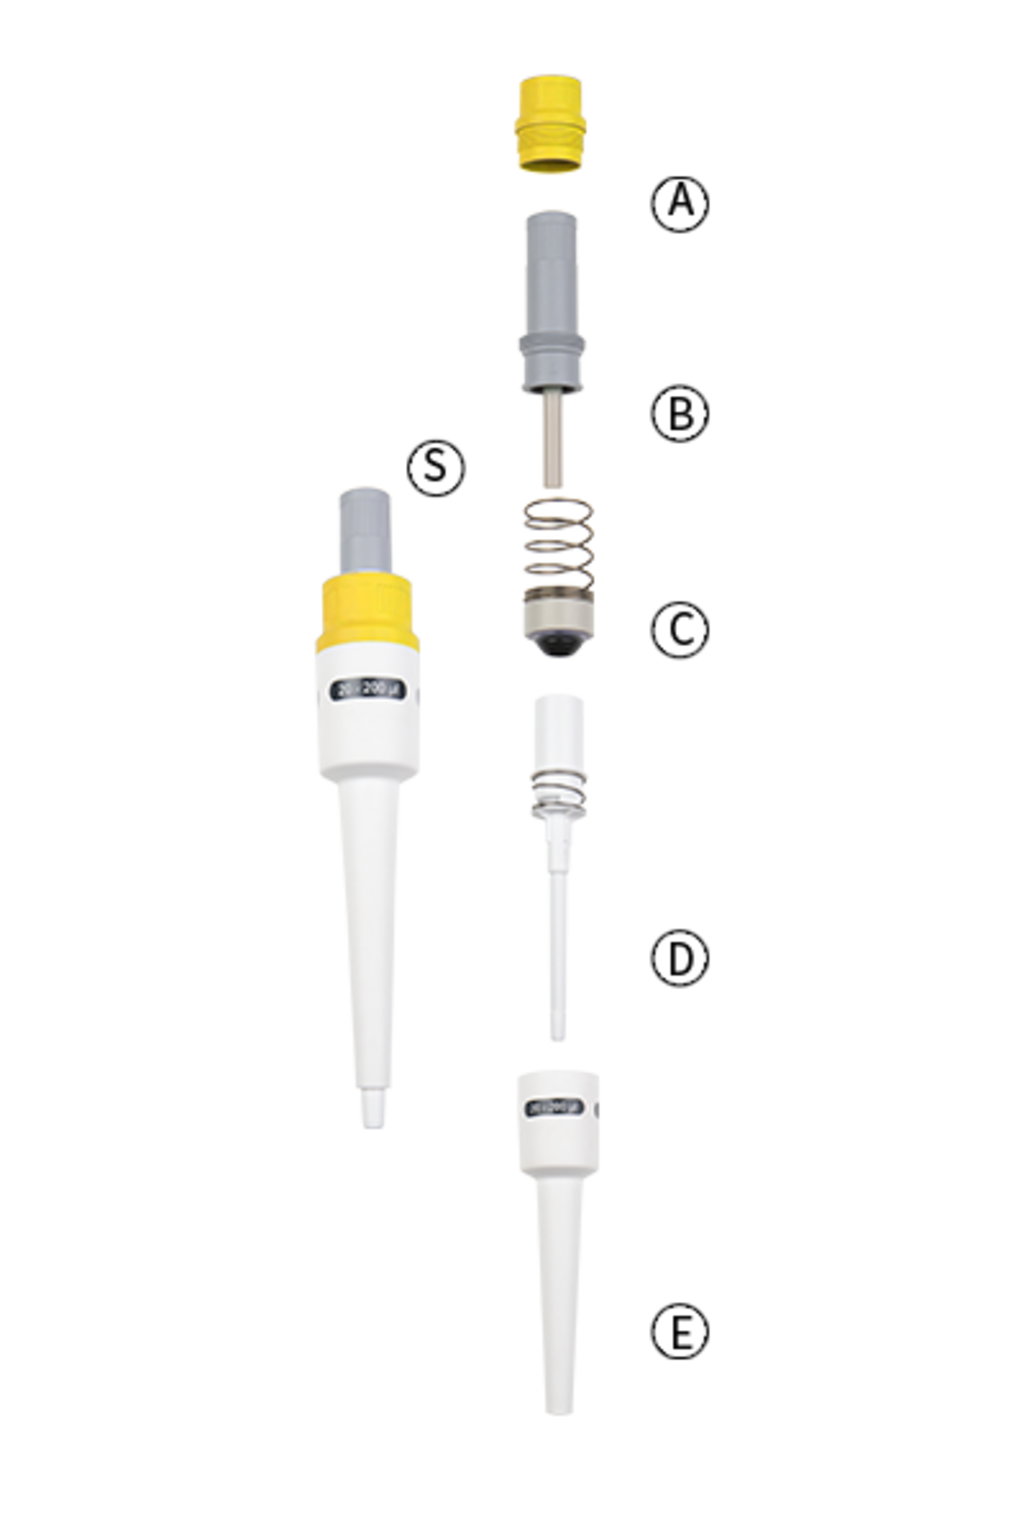
- Detach the shaft (S) from the hand grip by unscrewing it.
- Unscrew the top of the ejector unit (A), pull out the shaft and piston (B, C, & D) from the lower part of the ejector unit (E), and remove seals or springs (C).
- Clean parts with isopropanol or mild detergent, rinse with distilled water, and dry thoroughly.
- Lightly grease the piston and replace worn seals.
- Reassemble in reverse order.
Many models allow autoclaving of the pipetting unit or full device—check your manual.
Routine internal cleaning of handheld pipettes helps prevent buildup of residues and keeps seals in good condition.
BRAND Multi-Channel Pipettes
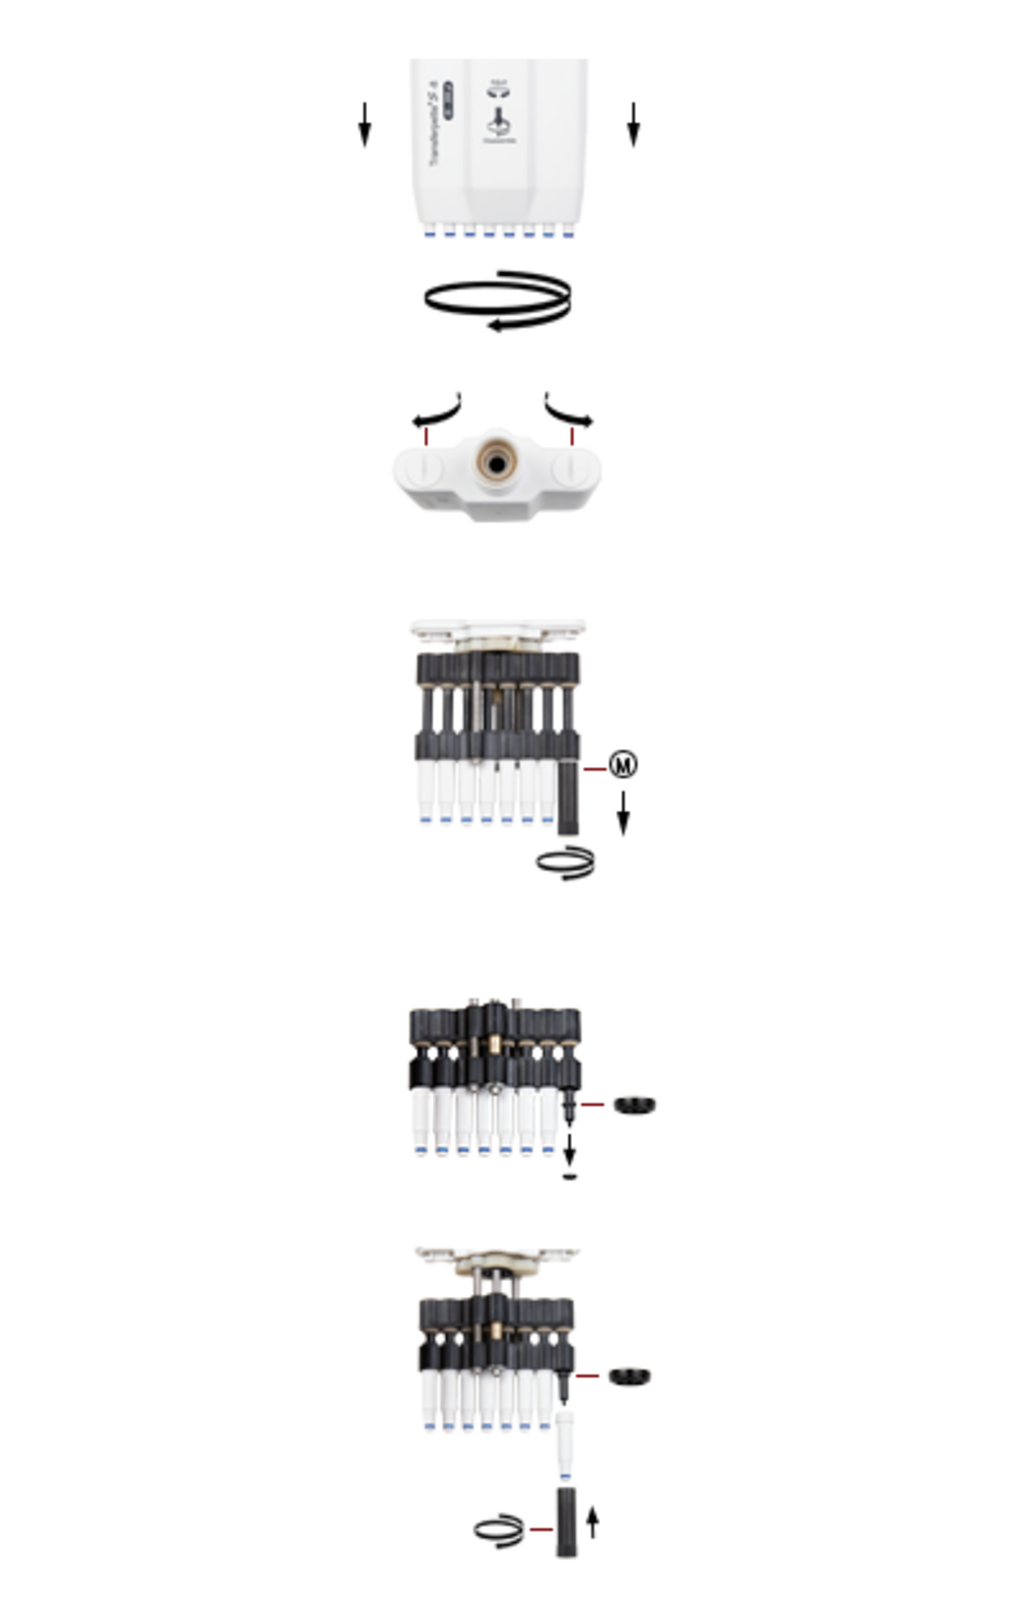
- Pull the pipetting unit downward and rotate clockwise to release.
- Remove the housing cover by rotating 90° using a coin
- Remove the shaft using the installation tool (M) and push the piston unit all the way down.
- Remove and inspect seals, clean or replace as needed, and re-grease the piston if required.
- Slide the seal onto the piston, flat side upwards. Mount and tighten the shaft using the installation tool (M).
- Reassemble and test for leaks before use.
Modern multichannel pipettes make it possible to increase throughput while still maintaining consistent precision across all channels.
Routine internal cleaning of handheld pipettes helps prevent buildup of residues and keeps seals in good condition.
Everyday Pipette Care Checklist
- Use recommended tips for proper sealing.
- Pre-wet tips when handling viscous or volatile liquids.
- Keep pipettes vertical with liquid in the tip to prevent ingress.
- Store pipettes upright on a stand.
- Wipe exterior surfaces after use with corrosive or sticky solutions.
- Run quick leakage tests between calibrations.
- Label each instrument with service dates.
- Train users on technique and daily checks.
These simple steps protect both your pipettes and your other lab equipment from unnecessary contamination.
When To Seek Professional Service
- Failed leakage tests or frequent calibration drift
- Persistent dripping or inconsistent volumes
- Visible cracks, corrosion, or worn threads
- Heavy use with aggressive solvents that damage seals
- Regulatory requirement for certified calibration or documentation
For professional support beyond routine maintenance, BRANDTECH offers certified repair and calibration services through our authorized repair partners, ensuring your pipettes remain accurate, compliant, and reliable.
Frequently Asked Questions on Pipette Maintenance
How often should I calibrate my pipettes?
Intervals vary from three to twelve months depending on workload and compliance requirements.
Use manufacturer-supplied silicone grease or a compatible product. Apply a very thin layer only.
Many models allow autoclaving of the pipetting unit or the entire device. Always confirm with the user manual.
Worn seals, contaminated pistons, poor tip fit, or liquid inside the shaft are common causes.